Sunday, December 4, 2011

iOS App Development with PhoneGap and Spine Mobile: iOS Example App

In my prior post, I made a simple modification to Alex MacCaw's mobile contacts example. Today I'll walk through the steps to wrap it with PhoneGap as an iOS application.

Detailed directions are available for setting up PhoneGap for iOS using Xcode. You'll also want to read Alex MacCaw's documentation on integrating Spine Mobile with PhoneGap. It's in the early stages of development so there is a bit of manual tweaking necessary.

Setup an Initial PhoneGap Project

Open a terminal and change to your spine mobile application directory. 

$ cd ~/Documents/spine.mobile.contacts
Create a subdirectory for your Xcode project. Alex suggests using ./build/ios within your spine project directory (e.g. ~/Documents/spine.mobile.contacts/build/ios).
Start Xcode and select the PhoneGap-based application template.


Enter your Product Name and Company Identifier. I chose MyContacts. Not very original, eh? 


Change the Scheme to iPhone 5.0 Simulator and run the application. You'll get a warning indicating the www folder is missing from your project and the iPhone Simulator will display an error message that index.html was not found.


Quit the iOS Simulator. Drag the www folder created in the project directory onto the project folder in Xcode. This will add a reference to it in your Xcode project. 


In the dialog box that pops up, make sure you check the Create folder references for any added folders option.


Run the project again and you'll get a default sample PhoneGap application with an alert in the iOS Simulator. It works!


Tweak your Spine Mobile Application for PhoneGap

You need to add phonegap.js to your spine mobile application. The current version is named phonegap-1.2.0.js. Make a new directory in the spine project directory called lib (~/Documents/spine.mobile.contacts/lib). Copy phonegap.js from the www directory (~/Documents/spine.mobile.contacts/build/ios/MyContacts/www) into the new lib directory. You also need to add phonegap.js to the libs section of the slug.json file.

{
  "dependencies": [
    "es5-shimify",
    "json2ify",
    "jqueryify",
    "gfx",
    "spine",
    "spine/lib/local",
    "spine/lib/ajax",
    "spine/lib/route",
    "spine/lib/tmpl",
    "spine/lib/manager",
    "spine.mobile"
  ],
  "libs": [
    "./lib/phonegap-1.2.0.js"
  ]
}

I also needed to modify the spine.mobile.contacts index.html page slightly. Change href="/application.css" and src="/application.js" to href="./application.css" and src="./application.js".

<!DOCTYPE html>
<html>
<head>
  <meta charset=utf-8>
  <title>App</title>
  <link rel="stylesheet" href="./application.css" type="text/css" charset="utf-8">
  <script src="./application.js" type="text/javascript" charset="utf-8"></script>
  <script type="text/javascript" charset="utf-8">
    var jQuery  = require("jqueryify");
    var exports = this;
    jQuery(function(){
      var App = require("index");
      exports.app = new App({el: $("body")});
    });
  </script>
  <meta name="viewport" content="width=device-width; initial-scale=1.0; minimum-scale=1; maximum-scale=1.0; user-scalable=0;"/>
  <meta name="apple-mobile-web-app-capable" content="yes" />
  <meta name="format-detection" content="telephone=no" />
</head>
<body>
</body>
</html>

Compile your application with hem from the spine project directory.$ hem build
At this point you could test your spine mobile application using a browser. Just run hem server and browse to http://localhost:9294/. You can even use your iPhone/iPod Touch if your computer firewall will allow it. Run a command like ifconfig or look in your network preferences for your ip address (e.g. http://192.168.1.112:9294).

$ hem server

You need to copy the contents of the spine mobile project public directory (~/Documents/spine.mobile.contacts/public) to the www directory in the Xcode project (~/Documents/spine.mobile.contacts/build/ios/MyContacts/www). You'll need to do this after each hem build. I added a step to the build phase to automate this. You could also add a command to build your spine mobile project before it's copied. For now, just copy application.css, application.js, cache.manifest, favicon.ico, and index.html manually. 

Run the Xcode project again... Voila!

You now have a working iOS application. Future posts will include setting up icons, syncing data with a server, etc.


Thursday, November 24, 2011

King Arthur Banana Bread

Finally used up our stash of over-ripe frozen bananas. We eat a log of bananas. Ocassionaly, we don't finish them off before they are too ripe so we toss them in the freezer whole - peel and all. When you need them, take them out of the freezer and thaw. Or you can peel them while frozen and nuke to defrost. They're also great for making a smoothie while still frozen (sans peel of course).

Used a recipe from King Arthur Flour and their white whole wheat flour. The crumb is nice and the texture even. It's slightly dry for my taste. Probably should substitute some of the butter with applesauce, use egg substitute, and perhaps use a 50/50 mix of whole wheat and white flour.

Ingredients

1/2 cup unsalted butter, at cool room temperature
2/3 cup brown sugar, light or dark, firmly packed
1 teaspoon vanilla extract
1 teaspoon ground cinnamon
1/4 teaspoon ground nutmeg
1 teaspoon baking soda
1 teaspoon baking powder
1 teaspoon salt
1 1/2 cups mashed ripe bananas (about 3 medium or 2 large bananas)
3 tablespoons apricot jam or orange marmalade, optional but tasty
1/4 cup honey
2 large eggs
2 1/4 cups King Arthur Unbleached All-Purpose Flour
1/2 cup chopped walnuts, optional

Directions

Preheat the oven to 325°F. Lightly grease a 9" x 5" loaf pan.

In a large bowl, combine the butter, sugar, vanilla, cinnamon, nutmeg, baking soda, baking powder, and salt, beating till smooth.

Add the mashed bananas, jam, honey, and eggs, again beating until smooth.

Add the flour, then the walnuts, stirring just until smooth.

Spoon the batter into the prepared loaf pan, smoothing the top. Let it rest at room temperature for 10 minutes.

Bake the bread for 45 minutes, then gently lay a piece of aluminum foil across the top, to prevent over-browning.

Bake for an additional 25 minutes. Remove the bread from the oven; a long toothpick or cake tester inserted into the center should come out clean, with at most a few wet crumbs clinging to it. The tester shouldn't show any sign of uncooked batter. If it does, bake the bread an additional 5 minutes, or until it tests done.

Allow the bread to cool for 10 minutes in the pan. Remove it from the pan, and cool it completely on a rack.


Nutritional Info

Serving Size 1 slice (60g)
Servings Per Batch 18
Amount Per Serving

Calories 170 
Calories from Fat 50 

Total Fat 6g 
Saturated Fat 3.5g 
Trans Fat 0g 
Cholesterol 35mg
Sodium 230mg
Total Carbohydrate 27g
Dietary Fiber 1g
Sugars 14g
Protein 3g

Crock Pot Pulled Pork with BBQ Sauce

There are few foods as magical as pork. Steak is great and might just be the king of protein. But would any sane person seriously believe bacon is anything but meat candy. I've always wanted to make pulled pork but have never tried. I have no idea why not. It's almost as easy as frying bacon in the oven.


Ingredients

1 yellow onions, sliced thick
2 to 3 pounds pork butt or shoulder - really, you want as much as will fit in your crock pot
Salt and pepper
Garlic powder
Onion powder
4 Whole cloves
2 cans Verners - oh, you can use Canada Dry if you must, but I live in Michigan :-)
Your favorite barbeque sauce - I like Sticky Fingers Memphis Style
2 tablespoons Worcestershire Sauce
Buns, Sandwich Thins, or some kind of crusty bread

Directions

Rub the pork with equal quantities of salt, pepper, garlic powder, and onion powder. You can use your favorite dry rub. This was just what we had on hand.

Put half the onion slices on the bottom of the crock pot.

Dump the pork into the crock pot and layer the top with the remaining onion slices.

Pour enough Verners into the crock pot to cover. I had so much pork, I had to shift it around to make sure the Verners worked its way to the bottom. Toss in the whole cloves.

Turn the crock pot to the lowest setting and cover. You want this to go low and slow. It needs to simmer at least 12 hours. We did ours overnight and didn't need to add liquid.

After 12 hours, remove the pork and onion slices and place them on a sheet pan so they cool quickly. Discard the liquid. Separate the fat and bones from the meat breaking the meat into chunks. I don't see how you can avoid breaking up the meat. At this point it's falling apart.

Return the meat and onions to the crock pot. Mix in Worcestershire Sauce and barbeque sauce. Turn the crock pot to the highest setting and reheat for an hour or use the microwave. We coudn't wait that long.

Pile the pulled pork on the bread and eat. What else are you going to do with it?

Migration from Posterous

I was blogging at Posterous but have decided to migrate here. Their recent change to mimic Google+ and Facebook is not really blog-worthy. 


So, all of the posts today are old ones I'm moving over by hand. Posterous doesn't make it easy to leave - no export tool.

King Arthur Amish Dinner Rolls

This is a tweaked version of the Amish Dinner Roll recipe from the King Arthur Flour Baker's Catalogue. 

You can find the original recipe here http://www.kingarthurflour.com/recipes/amish-dinner-rolls-recipe

Ingredients

2 eggs
1/3 cup sugar
1 1/2 teaspoons salt
6 tablespoons butter
1 cup mashed potatoes
2 1/2 teaspoons instant yeast
3/4 cup potato water (water used to boil potatoes)
4 1/2 cups unbleached all-purpose flour


Instructions
Combine all of the ingredients in the bowl of your Kitchen-aid mixer. Mix the dough with a dough hook, knead for 8 minutes. Resist the urge to add more flour, the dough will be very sticky.

Remove the dough from the mixer bowl to a floured surface. Knead the dough by hand for a couple of minutes. The dough should now be smooth and shiny.

Place the dough in a lightly greased bowl, turn to coat, and cover with plastic wrap sprayed with Pam to prevent sticking. Allow dough to rise until doubled in bulk, about 90 minutes.

Dump the dough onto a floured surface. Knead a few times to work out bubbles. With a stainless steel dough scraper, divide the dough into 16 equal pieces. The next part is a bit complicated to explain. You need to roll the dough into smooth balls.

Dust your hands with flour. Place a piece of dough on the half curled finger tips of both hands with your palms facing up. Gently stretch the dough into a mushroom cap by pressing your thumbs down the side of the dough ball whilst pressing your fingers up. Pinch the bottom of the dough together to form a ball. Rotate the dough ball half a turn to the right or left, keeping the pinched end down. Repeat a few times, dusting your hands as needed. You should find the top and sides of the dough ball get smoother with each turn. If this is a bit complicated, you can always roll the dough ball in your hands but the resulting ball won't be as smooth.

Lightly grease a pan. For pull-apart-rolls, place the dough balls about half an inch apart on the pan. This will give you rolls with a nice brown top and bottom, and nice white sides where they touch. For stand-alone-rolls, place the dough balls about 2 inches apart. Cover the rolls with plastic wrap sprayed with Pam, and allow to rise for 1 1/2 to 2 hours, until they are quite puffy. The pull-apart-rolls with be touching each other.

Preheat an oven to 350 degrees. Bake the rolls on the center rack, for 15 minutes or until golden brown. Carefully slide the rolls onto a cooling rack, and brush them with melted butter if desired.


Nutritional Information 
per serving (1 roll = 74g)
200 calories
6 grams fat
5 grams protein
28 grams complex carbohydrates
4 grams sugar
1 gram dietary fiber
41 milligrams cholesterol
223 milligrams sodium
117 milligrams potassium

Wednesday, November 23, 2011

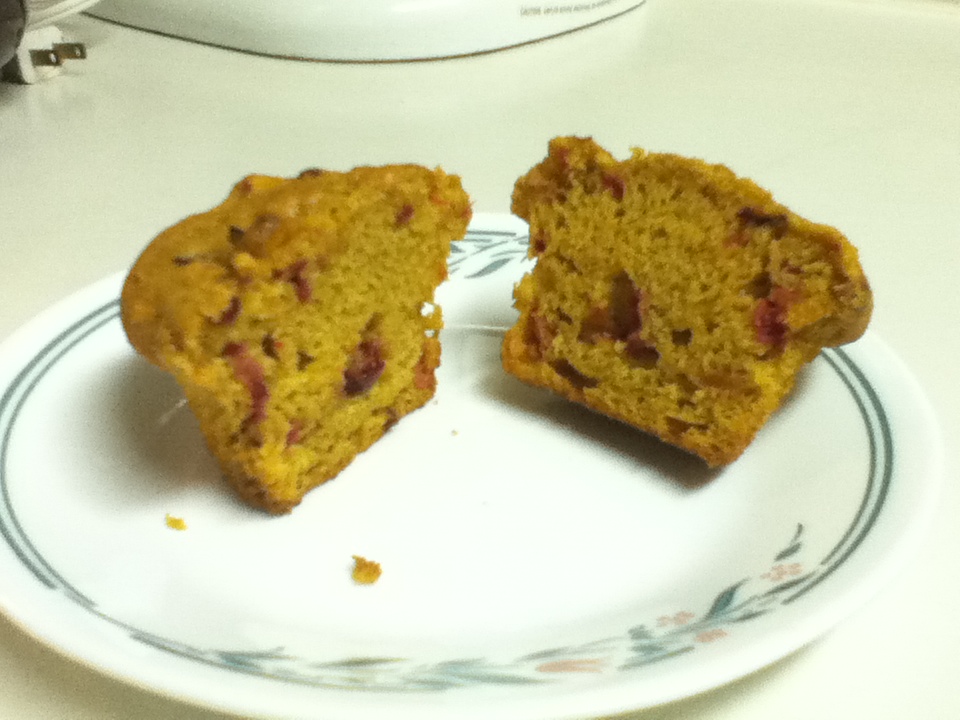
Vegan Pumpkin and Cranberry Muffins Recipe - Modified


My first attempt at Isa Chandra Moskowitz's Vegan Pumpkin Muffin didn't fare well. They were undercooked and dense. I was pretty sure the cranberries added too much moisture to the basic recipe.

A small adjustment (1/2 the soy milk) and an ingredient substitution (substitute 1/2 of the oil with apple sauce) gave better results. I think baking them longer helped too. 

Here's the modified recipe.

Vegan Pumpkin and Cranberry Muffin

Ingredients

1 3/4 cups King Arthur all-purpose flour
1 1/4 cups sugar
1 tablespoon baking powder
1/4 teaspoon salt
1 teaspoon ground cinnamon
1/2 teaspoon ground or freshly grated nutmeg
1/2 teaspoon ground ginger
1/4 teaspoon ground allspice
1/8 teaspoon ground cloves
1 cup pureed pumpkin (not pie mix)
1/4 cup soy milk (reduced from original recipe's 1/2 cup)
1/4 cup vegetable oil (
reduced from original recipe's 1/2 cup)
1/4 cup natural apple sauce (to reduce original recipe's vegetable oil)
1 cup whole fresh cranberries
2 tablespoons maple syrup (original recipe is molasses)

Directions

Preheat oven to 400°F. Use paper muffin liners or lightly grease a twelve-muffin tin.

Roughly chop the cranberries. I like larger chunks of cranberry in the muffin. 

Sift together flour, sugar, baking powder, salt, and spices. In a separate bowl, whisk together pumpkin, soy milk, oil, apple sauce, chopped cranberries, and maple syrup. Mix together the wet and dry ingredients.

Evenly fill the muffin cups. Mine ended up about three-fourths full. Bake for 25 to 28 minutes, until a toothpick or knife inserted in the center comes out clean.

Nutritional Information


Per Muffin
Calories 193.6
Total Fat 2.9 g
Saturated Fat 1.8 g
Polyunsaturated Fat 0.1 g
Monounsaturated Fat 0.1 g
Cholesterol 0.0 mg
Sodium 175.8 mg
Potassium 93.4 mg
Total Carbohydrate 41.2 g
Dietary Fiber 1.8 g
Sugars 24.2 g
Protein 2.4 g

Tuesday, November 22, 2011

iOS App Development with PhoneGap and Spine Mobile: Example App


Alex MacCaw, the creator of Spine and author of O'Reilly's JavaScript Web Applications, has a simple example of a mobile contact application. We'll set this application up, add a little functionality, and eventually wrap it in PhoneGap as a iOS app for the iPhone.

There's an explanation on spinejs.com you can follow for a thorough explanation of the application. 


Let's get it setup and running locally.
  1. Download the app from github.com. My copy is under ~/Documents/spine.mobile.contacts/.
  2. Open a terminal and change to the spine.mobile.contacts directory.
    $ cd ~/Documents/spine.mobile.contacts
  3. Install the local npm modules
    $ npm install .
  4. Start the hem server
    $ hem server
  5. Browse to the application at http://localhost:9294/
You should now see this...


Go ahead and add a few contacts. HTML5 local storage is used to persist the data.

Now, let's add a way to delete contacts. Open contacts.coffee located in the ~/Documents/spine.mobile.contacts/app/controllers/ directory with a text editor. We want to add a delete button to the ContactsShow class. ContactsShow is the controller for the panel that displays an individual contact when you click on a contact in the list view.

The changes are pretty simple.

class ContactsShow extends Panel
  className: 'contacts showView'

  constructor: ->
    super

    Contact.bind 'change', @render

    @active @change

    @addButton('Back', @back)
  
    # Delete button placed to the right with a callback 
    # to a delete function
    @addButton('Delete', @delete).addClass('right')

  render: =>
    return unless @item
    @html require('views/contacts/show')(@item)

  change: (params) ->
    @item = Contact.find(params.id)
    @render()

  # Delete callback function
  # Confirm the delete, then navigate back to the list view
  # If they change their mind, stay here
  delete: (params) ->
    if confirm('Are you sure?')
      @item.destroy() 
      @navigate('/contacts', trans: 'left')

  back: ->
    @navigate('/contacts', trans: 'left')

Save your changes. There's no need to restart the hem server. Just reload the site in the browser, hem dynamically picks up the changes with each request.

Click on a contact, the item view displays with the delete button on the top right.

Click the delete button. You should see a confirmation dialog...
Click cancel and you'll see the item view. Click ok, the contact is deleted and the list view is redisplayed.

In my next blog post I'll finish wrapping the app in PhoneGap.