Friday, November 25, 2022

Apple II - 6502 Assembly Programming - BUGS?

Apple II
6502 Assembly Programming
DOS BUGS!

BRUN and COUT

Not surprisingly, there are bugs in Apple DOS 3.3. One that appears to trip up novice assembly programmers, at least this programmer, is found when running a program that makes calls to I/O subroutines like COUT ($FDED). 

COUT is used to conveniently output text to the screen. It handles scrolling and moving the location along as you push text characters to it. Why reinvent the wheel, eh?

Well, if you run your program using BRUN, you'll end up in an infinite loop. 

How to Defuse a Bomb or A Note about BRUN and COUT

There was an episode of M*A*S*H, where Hawkeye and Trapper follow poorly written instructions to defuse a CIA propaganda bomb, causing the bomb to go off. 
Carefully cut the wires... leading to the clockwork fuse at the head.
But first, remove the fuse.

On page 35 of Assembly Lines: The Complete Book A beginner's Guide to 6502 Programming on the Apple ][, there is a note about BRUN and COUT. Unfortunately for me, I didn't read this until after I typed in and ran the example program on page 31. I spent about an hour going over the code, attempting to "fix" it thinking there was a typographical error or an error in the example code. Woops.

In the future, I'll read he entire chapter before I try out the code.

Here's an excerpt from  http://www.textfiles.com/apple/ANATOMY/cmd.brun.bload.txt explaining what goes on.

*--------------------------- N O T E ----------------------------*
*     The "JSR INITIOHK" instruction (at $A391) resets the I/O   *
* hooks to point to DOS's own I/O handlers (INPTINCP, $9E81 and  *
* OPUTINCP, $9EDB).  Therefore, any input or output performed by *
* your BRUNed program is scrutinized by DOS.  Each time INPTINCP *
* or OPUTINCP are entered, the stack pointer is saved in         *
* STKSAVED ($AA75).  However STKSAVED was previously set in the  *
* command parsing and processing routines before the BRUN command*
* handler was entered.  Because the BRUN command resets the stack*
* pointer incorrectly, the computer goes into an infinite loop   *
* AFTER your BRUNed program is executed.  If MON is NOT in       *
* effect, execution keeps on branching back into your program.   *
* Your program is re-entered at the first byte after the last    *
* instruction that called the routine that contained the         *
* "JMP (KSW)" or "JMP (CSW)" instruction. 

What to Do?

So, what can you do? There are a couple of work arounds. First, and easiest, is to not use BRUN. Run your program using BLOAD or to run it from the Monitor. There are also programmatic workarounds described in the reference above. 

For now, I'm going to avoid BRUN and will look for a best practice approach after more experience. So far, I've only learned a handful of OpCodes and typed in a couple of example programs. A few more to go I think.


Thursday, November 24, 2022

Apple IIe - 6502 Assembly Programming - A Full Screen Editor!

Apple IIe
6502 Assembly Programming - A Full Screen Editor!

Merlin-8 2.48 has a full screen editor that is a little bit easier to use than the single line editor. If you read my prior post where I created the program BEEP which calls the built in beep routine, you'll appreciate switching to the full screen editor. 

The manual for Merlin-8 and 16 (for the IIgs) can be found here http://www.apple-iigs.info/doc/fichiers/merlin816.pdf

Chris has an excellent video describing how to use the full screen editor here Assembly Lines #5: Merlin 8 Full Screen Editor.

Everything else is pretty much the same. I am using the DOS 3.3 version of the program. If you prefer ProDOS, there is a later version for that.

Here are the Full Screen Editor commands you won't find in the single line editor. If you are using AppleWin, the Open Apple key is the ALT key:
 
Open Apple+BGo to beginning of the source
Open Apple+NGo to the end of the source
Open Apple+DDelete the current line
Open Apple+RReplace the current line
Open Apple+EExchange (find and replace)
Open Apple+FFind text
Open Apple+IInsert a blank line
Open Apple+LLocate label, marker, or line number
Open Apple+QReturn to Editor Control Mode
Open Apple+XClipboard cut
Open Apple+VClipboard paste
Open Apple+YSelect all text to the end
Open Apple+8Create a line of asterisks
Open Apple+9Create a box of asterisks


Wednesday, November 23, 2022

Apple IIe - 6502 Assembly Programming - Getting Setup with a BEEP!

Apple IIe 
Assembly Programming - Getting Setup with a BEEP!

We're going to start with AppleWin. Why? It's easier and will let us focus on learning Assembly without fiddling with disks, etc. Once I get my wDrive, I'll setup to work on my physical Apple IIe hardware. 

Please note, I will not be providing tediously detailed, step-by-step, keypress-by-keypress instructions like this going forward. This is just a self contained post to get you started. There are much more detailed and better references (see bellow) than this blog or even my YouTube videos. What I will be doing is blogging/vlogging my journey and observations along the way.  

Reference Material

We're going to need a book or two. Some tutorials. Probably a few YouTube videos. 

Assembly Lines: The Complete Book A beginner's Guide to 6502 Programming on the Apple ][.

The first few of Roger Wagner’s Assembly Lines articles from Softalk magazine were assembled into a book back in the 80's. Unfortunately, the remaining articles, although planned for a second edition, were never published in book form. In 2014, Chris Torrence assembled and edited all of the articles and published a book. You can read more about it at Chris's web site above. This will be our primary guide for learning 6502 assembly programming.
  
You can either purchase Assembly Lines from Chris's web site above or download the PDF version.

Chris has a series of YouTube videos discussing Assembly Lines here Assembly Lines - CT6502.

Roger Wagner mentions several references in the introduction to the first edition. Fortunately, these are available from archive.org. You may also be able to find used copies available for purchase.


An Assembler

We'll be using the Merlin Macro Assembler from Southwestern Data Systems, version 2.43. You'll find here at macgui.com

CiderPress

CiderPress is a great tool to use along with your virtual AppleWin environment. With it you can create blank disk images, add files to a disk image, and other things from your computer. You can download CicerPress from  http://a2ciderpress.com/.

Getting Started

There is a great YouTube video showing how to get setup with AppleWin, Merlin, and CiderPress by PJG Creations Ltd here Apple II Assembly Programming with Merlin - Getting Started

Create a Blank Disk

You'll want a disk to store your assembly source code and object files. 
  • Create a DOS 3.3 disk image using CiderPress.
  • Start up AppleWin.
  • Load the DOS 3.3 disk image you created earlier as the first disk in AppleWin.
  • Click the second drive, and type in a name for your blank disk in the file dialog, and click "Open". This will cause AppleWin to create an unformatted disk when it boots. I used the name "BLANK". Pick whatever you want as long as it is not the name of an existing disk image in the subdirectory you are using.
  • Boot into DOS 3.3.
  • Initialize your unformatted disk. From the DOS prompt "]", type in the command "INIT BLANK,D2" to initialize the disk. 

Fire Up Merlin

  • Expand your Merlin Assembler disk image to a working subdirectory for your disk images.
  • From AppleWin, select the Merlin Assembler disk image for disk drive 1.
  • Select the formatted blank disk you created for disk drive 2.
  • Boot AppleWin.
You should now see the following screen. I'm not going to go into all of the commands. We'll just do enough to create, assemble, and save a simple program.

Merlin-Pro 2.43 Command Screen

Let Us BEEP!

Instead of "Hello, World!", the introductory assembly program appears to be a beep sound.
  • Switch to the blank disk you created to store your assembly source code and object files. Press the "D" key. You should see the "Drive: " switch from "1" to "2".
  • Type "C" for Catalog. The contents of disk 2 will be displayed. If you put in your empty disk, you should see something like the following:
BLANK Disk Volume

  • Press RETURN to leave the catalog view and return to the command screen.
  • Press "E" to start the assembly editor.
  • Press "A" and then RETURN to switch to append mode. A numeral one will appear with a block cursor following it, indicating you are on the first line of the program.
  • Press CTRL+P. A block of asterisks will appear. The asterisk in the first column, and any text following it, is ignored by the assembler as a comment. Press RETURN to begin the second line.
  • Press SPACE. This moves the cursor to the second column. And press CTRL+P again. An asterisk is placed at the beginning and ending of the second line with the cursor positioned after the first asterisk. Now you can space and type anything you wish on the line to describe your program. We'll use call this program "BEEP!". Press RETURN when you have finished typing.
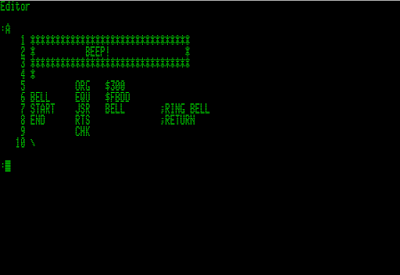
  • Press CTRL+P again to finish the comment block. Press RETURN, type in an asterisk, and press RETURN again. You're screen should look something like the following:


Our Program Header for BEEP!

The assembly source code is organized into four columns. Labels go into the first column. The Operation Code goes into the second column, the Operand into the third, and then comments in the forth column.

Our first command needs to tell the assembler where to locate the program in memory when it starts. Read the first chapter, Apple's Architecture, from Assembly Lines so you understand what this means, and why it is important.

  • We are now on line five if you have typed in the program header as I have above. Press SPACE to move to the cursor to the Operation Code column and type "ORG". The ORiGin command defines the memory location where the program will be run. Press SPACE to move to the operand column and type "$300". We'll start the program at hexadecimal address 300. Press RETURN to move to the next line.
  • Now type the label "BELL", a SPACE, the operation code "EQU", a SPACE, and the operand "$FBDD". This will create a convenient reference we can use for the location in memory for causing a beep to be made by the computer. Press RETURN to move to the next line.
  • Type in the label "START", a SPACE, the operation code "JSR", a SPACE, the operand "BELL", a SPACE, and the comment ": RING BELL". The label START is a convenience, syntactic sugar if you will, referencing the start of our program. The operation Jump to SubRoutine, causes the computer to execute the code found at the memory address $FBDD (remember the line that EQUates the label BELL with memory address $FBDD), which rings the bell. At the end of the bell ringing code, there is an operand that returns execution to the address after the subroutine is called. Press RETURN to move to the next line.
  •  Type in the label "END", a SPACE, the operation code "RTS", two SPACEs, and the comment "; RETURN". The "END" label denotes the end of our program. The operation ReTurn from Subroutine, returns execution of our program back to where it was started, which will be the computer's operating system. Press RETURN to move to the next line.
  • Press SPACE, and the operation code CHK. CHecKsum is not a real operation code. It's a pseudo-opcode that instructs the assembler to insert a single byte containing the checksum for the entire program. You can use the checksum to verify the program was typed in correctly. Press RETURN to move to the next line.
  • Press RETURN, an empty line tells the editor to leave editing mode. Your screen should look something like the following:

The BELL! program completed in the editor


If you are having difficulty with the editor, you can reference Appendix B: Beginner's Guide to Merlin where you will find helpful instructions on using the editor and correcting mistakes. 

Code, Assemble!

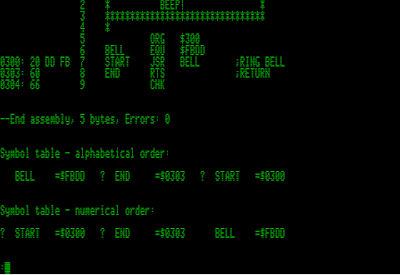
Now we can assemble the code. Type ASM and press RETURN. You will be prompted with "UPDATE SOURCE (Y/N)?". Press "N". Your screen will scroll up and you'll see something like the following:

After running the assembler

If everything went well, you should see "Errors: 0" on the screen indicating no errors were found. If you have errors, you'll need to edit your program to correct any typos. 

Press "Q" and RETURN to quite the editor and return to command mode. 

Save That Source Code

At the "%" prompt, press "S" to save your source code. You are prompted with "Save:". Type in "BEEP" and press RETURN. The screen will refresh and you are returned to the "%" prompt.

Save The Object Code

Press "O" to save your object code. Since you just saved your source code, you are prompted with the same name you gave the source code file. Press "Y" to accept the name.

Was it Saved?

Press "C" to run the catalog command. You should see your program source and object code listed as "BEEP.S" and "BEEP". 

BEEP saved to disk

With your program source code and assembled object code saved to disk, you can leave Merlin. Press RETURN to leave the catalog and then "Q" to quit. You'll notice that you can reenter Merlin by typing "ASSEM" and RETURN at the "]" prompt. 

Run BEEP!

Let's give our program a test run. Type "BRUN BEEP" and RETURN to run the program. If all went well, you should hear a beep. If you don't, check your sound settings on AppleWin.


Thursday, November 10, 2022

Apple IIe - Apple FORTRAN - It's an odd language and HELLO, WORLD!

Known as FORTRAN (FORmula TRANSlating system, FORmula TRANslator, or possibly FORmula TRANSlation), is an early programming language known for it's use in numerical computation and scientific computing. 

Statement Format

It's an odd language that has a statement structure that reflects it's original representation on 80 character punch cards. 


Columns 1 to 5 are reserved for line numbers.

Column 6 is reserved for the line continuation character, an asterisk (*). 

Columns 7 to 72 are for programming statements. Unfortunately, a TAB will move you to column 9 instead of 7. I suggest just using the TAB key and waste columns 7 and 8.

Columns 73 to 80 were originally used to write comments, like line number to keep your cards in order. They are ignored by the compiler.

If your statement must extend past column 72, you continue on the next line by putting an asterisk in column 6 and then continue typing your statement in column 7. 

If you deviate from the column format above, your program will not compile.

Variables

Variable names must begin with the letter A to Z, followed by letters and/or the digits 0 to 9, and are limited to six characters. For example, FOOBAR, FOO999, FOR, and NEXT are all valid variable names. 9BAR, F$$BAR, ME&YOU, and THISISALONGNAME are invalid variable names.

Reserved Key Words

There are none! Key words are recognized by their position in context of the statement. 

The First Line

The first line of your program must be six spaces followed by the word PROGRAM starting in the seventh column, followed by a space, and then the name of the program. The name of the program must be a valid variable name. In fact, you cannot use the program name in the program as a variable name.

The Last Line

The last line of your program must be he word END starting in the seventh column followed by a single press of the RETURN key. The editor will place the cursor on the line immediately below the "E" in the END statement. If you move remove spaces or insert anything past this position, your program will fail to compile.

Numbers, Strings, Assignment Statements, etc.

Instead of reinventing the wheel here, I'm going to refer you to the following book - Learning Apple Fortran by Donald J. Geenen. The information above and more along with examples can be found here. 

Editing a Program

Let's type in the classic hello, world! program.

Put your FORT1 and FORT2 disks into your Apple IIe and start it up. Or, start AppleWin or some other emulator. You can find the disk images you need on the internet. 

You will see the command program running at the top of your screen.

Command: E(dit, R(un, F(ile, C(omp, L(ink, X(ecute, A(ssem, D(ebug,? [1.1]

Type "E" to enter the editor. If you get the error "No file :SYSTEM.EDITOR", try again. I think the emulator forgets to read the disk?

The editor program will start and load whatever text you have in the SYSTEM.WRK.TEXT file. SYSTEM.WRK.TEXT is the workfile used by the editor as a disk buffer file. 

If you are sure you want to start with a new file, before starting the editor, start the filer program and create a new workfile by typing "F" from the command line, then "N". You will be prompted to throw away the current workfile. Type "Y". The workfile will be cleared. Exit the filer by typing "Q" to quit and return to the command program. After clearing the workfile and restarting the editor, you will be prompted "No workfile is present. File? (<ret> for no file <esc-ret> to exit ):".Type RETURN.

Now, you are ready to edit your program. You would be forgiven for thinking you could just start typing. The editor does not work the way you're accustomed. It's more like a primitive version of VI. At least you're not working from a teletypewriter with ED. ED is a single line editor.

>Edit: A(djust C(py D(lete F(ind I(nsrt J(mp R(place Q(uit X(chng Z(ap  [1.1]

You need to put the editor into insert mode by typing "I". The command menu will change to:

>Insert: Text {<bs> a char, <del> a line} [<ext> accepts, <esc> escapes]

You can now start inserting your text. If you backspace, you will move the cursor back, erasing your text as you move back. Type CTRL+C to leave insert mode and save the text you entered into the program buffer. This is not the same as saving it to the workfile. It just puts the text onto the screen. If you flub it up and want to escape, losing the text you entered after moving into insert mode, type the ESCAPE key.

Remember, your first line needs to be six spaces, the word "PROGRAM" a single space, and the program name. If you mistype, just press backspace until you get back to where you can retype.

>Insert: Text {<bs> a char, <del> a line} [<ext> accepts, <esc> escapes]
      PROGRAM FOOBAR

If you need to edit text in a particular position, while not in edit mode, use the cursor keys to move to the desired location, then switch to insert mode.

Let's say we changed our mind and want the program name to be "HELLO" and not "FOOBAR". Move the cursor with the arrow keys to the "F" in "FOOBAR" and type "I". It will look like something has gone seriously wrong. The text "FOOBAR" will shift way over to the right hand end of the screen, leaving a huge amount of space between the cursor and the text "FOOBAR". The editor is just giving you room to type.

Type "HELLO" and press CTRL+C. The screen will move the text "FOOBAR" back next to "HELLO" resulting in:

>Edit: A(djust C(py D(lete F(ind I(nsrt J(mp R(place Q(uit X(chng Z(ap  [1.1]
      PROGRAM HELLOFOOBAR

Now, you need to delete "FOOBAR". If it isn't already there, move the cursor to the "F" in "FOOBAR" and type "D" to enter delete mode.

>Delete: < > <Moving commands> {<etx> to delete, <esc> to abort}
      PROGRAM HELLOFOOBAR

Type several spaces. As you type, the characters in "FOOBAR" are replaced by spaces. Type CTRL+C when you have finished removing "FOOBAR".

>Edit: A(djust C(py D(lete F(ind I(nsrt J(mp R(place Q(uit X(chng Z(ap  [1.1]
      PROGRAM HELLO

This sounds tedious, and I suppose it is. You'll get used to it, or not. Welcome to vintage software development!

Type in the rest of the program. Remember to properly enter the "END" at the end of the program. I'll add a column header to help line it up.

         1         2         3         4         5         6        7         8
12345678901234567890123456789012345678901234567890123456789012345678901234567890
#####*SSSSSSSSSSSSSSSSSSSSSSSSSSSSSSSSSSSSSSSSSSSSSSSSSSSSSSSSSSSSSSSSSSCCCCCCCC
      PROGRAM HELLO
100   FORMAT (A)
      WRITE (*, 100) 'Hello, World!'
      END

Your program in the editor should look like the following. Notice how the cursor is placed directly under the "E" in the "END" statement. 

Type "Q" to quite the editor. You are prompted with the following choices:

>Quit: 
     U(pdate the workfile and leave
     E(xit without updating
     R(eturn to he editor without updating
     W(rite to a file name and return
     S(ave with same name and return 

Type "U" to update the workfile and leave the editor back to the command menu.

Compile and Run a Program

Now that we have our HELLO program ready, let's run it. The easiest way to accomplish this is to simply type "R" from the command menu. Your program will be compiled, linked, and run.

Compiling...
Listing file? 

You are prompted for a listing file. If you want to learn more about the compiler, please reference the book Learning Apple Fortran by Donald J. Geenen or the Apple II FORTRAN Language Reference Manual. For now, just press the RETURN key.

If you have an error in the program, the compiler will show you the error number and the line the error occurred on. Press the SPACE key to force the compiler to continue, ESCAPE to terminate compilation, or "E" to edit the program. The error is displayed at the top line of the editor. Press SPACE to edit and correct your code. If you look at the listing from the screen shot above, you may notice a double-quote at the end of the HELLO, WORLD! text instead of a single quote.

If everything goes well, and you have no compiler errors, your program will compile. Once compilation has finished, the linker will run to link your program to the necessary libraries, and then finally, it is run.


Type "Q" to quite.

Saving your Program

You could finish her. However, your HELLO program source is stored in the workfile SYSTEM.WRK.TEXT and the executable in SYSTEM.WRK.CODE. Not the most convenient place. If you followed my post Apple IIe - Apple Fortran/Pascal 1.1 - How to Format and Name a Disk, you should have a blank disk named "FCODE". 

Start the filer program by typing "F" then replace disk "FORT1" with your "FCODE" disk. Type "T" to start the Transfer program. You are prompted "Transfer ?". Type in SYSTEM.WRK.TEXT and press the ENTER key. You are prompted "To where ?". Type in FCODE:HELLO.TEXT and press the ENTER key. If you have done everything correctly, you will see:

Filer: G, S, N, L, R, C, T, D, Q [1.1]
To where ? FCODE:HELLO.TEXT
FORT1:SYSTEM.WRK.TEXT
 --> FCODE:HELLO.TEXT

If you could check to see by listing the files on the FCODE disk. Type "L" to list files. You are prompted "Dir listing of ?". Type in "FCODE:" and press ENTER (without the double quotes). The colon indicates you want a disk listing.

Dir listing of ?
FCODE:
DEMO.TEXT           4 25-Jan-99
DEMO.CODE          26 25-Jan-99
SIREN.TEXT          4 25-Jan-99
SIREN.CODE         26 25-Jan-99
SIREN2.TEXT         4 25-Jan-99
SIREN2.CODE        26 25-Jan-99
GALLNS.TEXT         4 25-Jan-99
GALLNS.CODE        26 25-Jan-99
HELLO.TEXT          4 25-Jan-99
9/9 files, 150 unused, 133 in largest

Now, copy over the CODE file with your executable program. Follow the directions about substituting "TEXT" with "CODE". 

Dir listing of ?
FCODE:
DEMO.TEXT           4 25-Jan-99
DEMO.CODE          26 25-Jan-99
SIREN.TEXT          4 25-Jan-99
SIREN.CODE         26 25-Jan-99
SIREN2.TEXT         4 25-Jan-99
SIREN2.CODE        26 25-Jan-99
GALLNS.TEXT         4 25-Jan-99
GALLNS.CODE        26 25-Jan-99
HELLO.TEXT          4 25-Jan-99
HELLO.CODE         26 25-Jan-99
10/10 files, 124 unused, 107 in largest


Tuesday, November 8, 2022

Apple IIe - Apple Fortran/Pascal 1.1 - How to Format and Name a Disk

This took a while to sort out. It applies to Pascal 1.1 as well, since you need the Pascal APPLE3 disk FORMATTER program to do this with Apple Fortran.

A handy command to check to see what disks you have mounted, is the "V" command.

To list the volumes:

  1. Press "F" for the Filer command.
  2. Press "V" for the volume command.
  3. It responds by listing the volumes.
Vols on-line:
    1    CONSOLE:
    2    SYSTERM:
    4 # FORT1:
    5 # FORT2:
    6    PRINTER:
    7    REMIN:
    8    REMOUT:
11   # APPLE3:
12   # BLANK:
Root vol is - FORT1:
Prefix is     - FORT1:

Now, to format a disk:

  1. Put the APPLE3 disk into the first drive and an unformatted disk in the second drive.
  2. Run the FORMATTER program with the command.
  3. Press "X" to X)ecute a program.
  4. At the Execute what file? prompt, type in APPLE3:FORMATTER and press enter.
  5. At the Format which disk (4, 5, 9..12)? prompt, type in the disk number that matches the second drive. In my two drive system this is 5. In my Apple //e Emulator with four drives enabled, it is 12.
  6. If this is a formatted disk, you will be asked if you want to DESTROY DIRECTORY OF DISKNAME?. Type Y.
  7. It will respond with NOW FORMATTING DISKETTE IN DRIVE 12 
  8. You are prompted to format another disk. Either format another disk, or press Return to skip.
  9. It will respond with THAT'S ALL FOLKS...
You now have a formatted disk named "BLANK" in the second drive.

To rename the disk:

  1. Start the Filer, type "F".
  2. Change, type "C".
  3. At the "Change ?" prompt, enter the name of the disk followed by ":" to indicate it's the volume name and not a file, type BLANK: and press enter.
  4. At the "Change to what?" prompt, enter the new volume name, type FCODE: and press enter. If you forget to add the ":", it will ignore the command.
  5. It responds with "BLANK:                          --> FCODE:"
  6. You can check by using the Filer command "V" to view the volumes.


Friday, November 4, 2022

Apple IIe - Apple Pascal 1.3 - Getting to "Hello, World!"

Now that we have an Apple Pascal 1.3 setup going, see Apple IIe - Apple Pascal 1.3 - Setup & Configuration for getting started, let's create the classic "Hello, World!" program.

So, you go through some interesting steps to create a program file to compile and run. Instead of the more familiar UNIX or DOS command line command structure I'm used to using, the Pascal OS has a menu system to execute commands.

I won't go into great detail here. The reference, https://archive.org/details/apple-ii-pascal-1.3, explains file management. I will go through the commands for a basic hello world program.

You may recall the startup screen is as follows:

Command: F(ile, E(dit, R(un, C(omp, L(ink, X(ecute, A(ssem, ? [1.3]


Welcome APPLE1, to Apple II Pascal 1.3

Based on UCSD Pascal II.1

Current date is 10-Apr-90

Pascal system size is 68K


Copyright Apple Computer 1970,1980,1983,1984,1985

Copyright U.C. Regents 1979

The top line is the command menu. 

1. Type "E" to edit a file. This opens the work file for editing. 
2. Type "I" to change to insert mode.
2. Type in your program:

PROGRAM HELLO;
BEGIN
    WRITELN('HELLO, WORLD!')
END.

3. When you have completed typing, press CTRL+C to exit insert mode.
4. Type "Q" to quite the editor.
5. Type "U" to update the work file.
6. Type "E" to leave the editor to the command line. 

To compile, type "C". You will be prompted to list the file. Press Return for none.
Compiling will start.

Here is where I ran into problems. I received a stack overflow error for a simple one line program. I tried adding a switching compiler directive by adding "{$S+}" as the first line of the source. The stack overflow went away, but I received a "Error in factor (bad expression)" error on the "END." statement. Nothing I tried would get it to compile. I typed in a small example program from the reference above, same issue.

So, I tried other sets of disks hoping that the issue was a corrupted disk set. I tried leaving the OS set for 64K instead of 128K. I tried it on my Apple IIe and on AppleWin with the same results.

Finally, I downloaded Apple Pascal 1.1 and tried it. The same program that would not compile, compiled just fine under version 1.1.

I don't know what the problem is. I'll continue using Apple Pascal 1.1 until I can sort it out.

Tuesday, November 1, 2022

Apple IIe - Apple Pascal 1.3 - Setup & Configuration

My notes for setting up Apple Pascal 1.3 on an Apple IIe with two 5 1/4" disk ][ drives.

Download disk images for the four Apple Pascal 1.3 disks. I went here https://mirrors.apple2.org.za/Apple%20II%20Diskware/Pascal/

The following was a "good enough" reference. It required jumping around a bit to understand the command structure. https://archive.org/details/apple-ii-pascal-1.3. The following description of the four disks was found in this reference.

APPLE0: contains all the files needed to edit and run Pascal programs, especially on a one-drive system; it includes SYSTEM.COMPILER, but not SYSTEM.APPLE, which is needed to start up the system. This is the second of two disks used for a two-stage boot on a one-drive system. 

APPLEl: contains all the files you need to edit text and to start up the system. It is used in conjunction with the APPLE2: disk to compile or run Pascal programs. 

APPLE2: contains the Compiler, Linker, Assembler, and other program development tools. It is used for program development. 

APPLE3: contains SYSTEM.APPLE, the Formatter program, several other utility programs, a few demonstration programs for the general user, and the 128K.APPLE and 128K.PASCAL files needed to use additional memory. It also contains the .MISCINFO files needed for use on an Apple II or II Plus. This is the first of two disks used for a two-stage boot. 

First, create the four floppy disks needed for Apple Pascal 1.3. This proved to be harder than I thought. ATDPro was too picky about audio levels to work. I ended up using the command line program c2t used by X found on GitHub here https://github.com/datajerk/c2t. I converted the disk images to low bit rate wave files and moved them to the Apple II using the "LOAD" command.

Once I had all four disks (named "APPLE0",  "APPLE1", "APPLE2", and "APPLE3"), I inserted disk APPLE1 into drive 1 and booted.

I was greeted with this screen:

Command: F(ile, E(dit, R(un, C(omp, L(ink, X(ecute, A(ssem, ? [1.3]


Welcome APPLE1, to Apple II Pascal 1.3

Based on UCSD Pascal II.1

Current date is 10-Apr-90

Pascal system size is 68K


Copyright Apple Computer 1970,1980,1983,1984,1985

Copyright U.C. Regents 1979


My Apple IIe has the 80 column 64K expansion card, so the first thing I did was duplicate the APPLE1 disk and modify it to support 128K. 

First, you need to format a disk. 

  1. Insert disk APPLE3 into drive 1.
  2. Insert an unformatted disk into drive 2.
  3. Type "X" to start the execute command.
  4. At the prompt "Execute what file ?", type "APPLE3:FORMATTER" and press Enter.
  5. At the prompt "Format which volume # ? (4, 5, 9..12, <esc> to exit) ==>", type "#5" and press Enter for the second drive. 
  6. At the prompt, "Enter new volume name for this disk. (<ret> for default name of BLANK:, <esc> to exit) ==>", press Enter.
  7. Press ESC to return to the command line.
Then you will need to transfer disk APPLE1 to the newly formatted disk.
  1. Insert disk APPLE1 into drive 1.
  2. Insert the formatted blank disk into drive 2. 
  3. Type "F" to enter Filer from the command line.
  4. Type "T" to enter Transfer from the command line. 
  5. At the prompt "Transfer what file?", type "APPLE1:" and press Enter.
  6. At the prompt "To where?", type "#5" and press Enter.
  7. At the prompt, "Transfer 280 blocks ? (Y/N)", type "Y" and press Enter.
Now, copy the files 128K.SYSTEM and 128K.PASCAL from APPLE3 to APPLE1 overwriting SYSTEM.APPLE and SYSTEM.PASCAL respectively. 
  1. Insert disk APPLE1 into drive 1.
  2. Insert disk APPLE3 into drive 2.
  3. Type "F" to enter Filer from the command line.
  4. Type "T" to enter Transfer from the command line.
  5. At the prompt "Transfer what file?", type "APPLE3:128K.SYSTEM" and press Enter.
  6. At the prompt "To where?", type "APPLE1:SYSTEM.APPLE" and press Enter.
  7. At the prompt "Delete APPLE1:SYSTEM.APPLE", type "Y" and press Enter.
  8. Repeat steps 5 and 6 for SYSTEM.PASCAL.
Remove disk APPLE3 and reboot. You should now see the start up screen with the following:

Pascal system size is 128K