Apple IIe
Assembly Programming - Getting Setup with a BEEP!
We're going to start with AppleWin. Why? It's easier and will let us focus on learning Assembly without fiddling with disks, etc. Once I get my wDrive, I'll setup to work on my physical Apple IIe hardware.
Please note, I will not be providing tediously detailed, step-by-step, keypress-by-keypress instructions like this going forward. This is just a self contained post to get you started. There are much more detailed and better references (see bellow) than this blog or even my
YouTube videos. What I will be doing is blogging/vlogging my journey and observations along the way.
Reference Material
We're going to need a book or two. Some tutorials. Probably a few YouTube videos.
The first few of Roger Wagner’s Assembly Lines articles from Softalk magazine were assembled into a book back in the 80's. Unfortunately, the remaining articles, although planned for a second edition, were never published in book form. In 2014, Chris Torrence assembled and edited all of the articles and published a book. You can read more about it at Chris's web site above. This will be our primary guide for learning 6502 assembly programming.
You can either purchase Assembly Lines from Chris's web site above or download the PDF version.
Roger Wagner mentions several references in the introduction to the first edition. Fortunately, these are available from archive.org. You may also be able to find used copies available for purchase.
An Assembler
We'll be using the Merlin Macro Assembler from Southwestern
Data Systems, version 2.43. You'll find here at
macgui.com.
CiderPress
CiderPress is a great tool to use along with your virtual AppleWin environment. With it you can create blank disk images, add files to a disk image, and other things from your computer. You can download CicerPress from
http://a2ciderpress.com/.
Getting Started
Create a Blank Disk
You'll want a disk to store your assembly source code and object files.
- Create a DOS 3.3 disk image using CiderPress.
- Start up AppleWin.
- Load the DOS 3.3 disk image you created earlier as the first disk in AppleWin.
- Click the second drive, and type in a name for your blank disk in the file dialog, and click "Open". This will cause AppleWin to create an unformatted disk when it boots. I used the name "BLANK". Pick whatever you want as long as it is not the name of an existing disk image in the subdirectory you are using.
- Boot into DOS 3.3.
- Initialize your unformatted disk. From the DOS prompt "]", type in the command "INIT BLANK,D2" to initialize the disk.
Fire Up Merlin
- Expand your Merlin Assembler disk image to a working subdirectory for your disk images.
- From AppleWin, select the Merlin Assembler disk image for disk drive 1.
- Select the formatted blank disk you created for disk drive 2.
- Boot AppleWin.
You should now see the following screen. I'm not going to go into all of the commands. We'll just do enough to create, assemble, and save a simple program.
 |
| Merlin-Pro 2.43 Command Screen |
Let Us BEEP!
Instead of "Hello, World!", the introductory assembly program appears to be a beep sound.
- Switch to the blank disk you created to store your assembly source code and object files. Press the "D" key. You should see the "Drive: " switch from "1" to "2".
- Type "C" for Catalog. The contents of disk 2 will be displayed. If you put in your empty disk, you should see something like the following:
 |
| BLANK Disk Volume |
- Press RETURN to leave the catalog view and return to the command screen.
- Press "E" to start the assembly editor.
- Press "A" and then RETURN to switch to append mode. A numeral one will appear with a block cursor following it, indicating you are on the first line of the program.
- Press CTRL+P. A block of asterisks will appear. The asterisk in the first column, and any text following it, is ignored by the assembler as a comment. Press RETURN to begin the second line.
- Press SPACE. This moves the cursor to the second column. And press CTRL+P again. An asterisk is placed at the beginning and ending of the second line with the cursor positioned after the first asterisk. Now you can space and type anything you wish on the line to describe your program. We'll use call this program "BEEP!". Press RETURN when you have finished typing.
- Press CTRL+P again to finish the comment block. Press RETURN, type in an asterisk, and press RETURN again. You're screen should look something like the following:
 |
| Our Program Header for BEEP! |
The assembly source code is organized into four columns. Labels go into the first column. The Operation Code goes into the second column, the Operand into the third, and then comments in the forth column.
Our first command needs to tell the assembler where to locate the program in memory when it starts. Read the first chapter, Apple's Architecture, from Assembly Lines so you understand what this means, and why it is important.
- We are now on line five if you have typed in the program header as I have above. Press SPACE to move to the cursor to the Operation Code column and type "ORG". The ORiGin command defines the memory location where the program will be run. Press SPACE to move to the operand column and type "$300". We'll start the program at hexadecimal address 300. Press RETURN to move to the next line.
- Now type the label "BELL", a SPACE, the operation code "EQU", a SPACE, and the operand "$FBDD". This will create a convenient reference we can use for the location in memory for causing a beep to be made by the computer. Press RETURN to move to the next line.
- Type in the label "START", a SPACE, the operation code "JSR", a SPACE, the operand "BELL", a SPACE, and the comment ": RING BELL". The label START is a convenience, syntactic sugar if you will, referencing the start of our program. The operation Jump to SubRoutine, causes the computer to execute the code found at the memory address $FBDD (remember the line that EQUates the label BELL with memory address $FBDD), which rings the bell. At the end of the bell ringing code, there is an operand that returns execution to the address after the subroutine is called. Press RETURN to move to the next line.
- Type in the label "END", a SPACE, the operation code "RTS", two SPACEs, and the comment "; RETURN". The "END" label denotes the end of our program. The operation ReTurn from Subroutine, returns execution of our program back to where it was started, which will be the computer's operating system. Press RETURN to move to the next line.
- Press SPACE, and the operation code CHK. CHecKsum is not a real operation code. It's a pseudo-opcode that instructs the assembler to insert a single byte containing the checksum for the entire program. You can use the checksum to verify the program was typed in correctly. Press RETURN to move to the next line.
- Press RETURN, an empty line tells the editor to leave editing mode. Your screen should look something like the following:
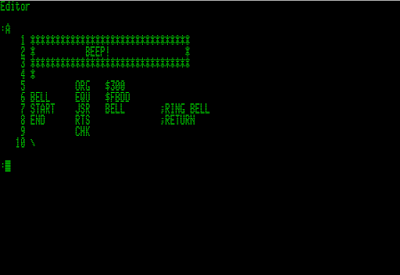 |
| The BELL! program completed in the editor |
If you are having difficulty with the editor, you can reference Appendix B: Beginner's Guide to Merlin where you will find helpful instructions on using the editor and correcting mistakes.
Code, Assemble!
Now we can assemble the code. Type ASM and press RETURN. You will be prompted with "UPDATE SOURCE (Y/N)?". Press "N". Your screen will scroll up and you'll see something like the following:
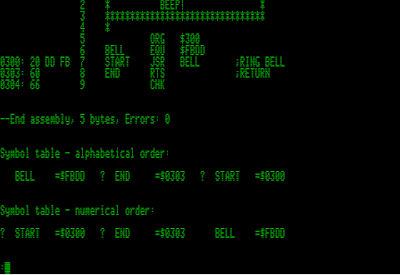 |
| After running the assembler |
If everything went well, you should see "Errors: 0" on the screen indicating no errors were found. If you have errors, you'll need to edit your program to correct any typos.
Press "Q" and RETURN to quite the editor and return to command mode.
Save That Source Code
At the "%" prompt, press "S" to save your source code. You are prompted with "Save:". Type in "BEEP" and press RETURN. The screen will refresh and you are returned to the "%" prompt.
Save The Object Code
Press "O" to save your object code. Since you just saved your source code, you are prompted with the same name you gave the source code file. Press "Y" to accept the name.
Was it Saved?
Press "C" to run the catalog command. You should see your program source and object code listed as "BEEP.S" and "BEEP".
 |
| BEEP saved to disk |
With your program source code and assembled object code saved to disk, you can leave Merlin. Press RETURN to leave the catalog and then "Q" to quit. You'll notice that you can reenter Merlin by typing "ASSEM" and RETURN at the "]" prompt.
Run BEEP!
Let's give our program a test run. Type "BRUN BEEP" and RETURN to run the program. If all went well, you should hear a beep. If you don't, check your sound settings on AppleWin.


