Sunday, February 28, 2021

Retro Computing: Macintosh SE FDHD -> WiFi232 Modem -> Raspberry Pi PPP Server -> Internet

Retro Computing:
Connecting a Macintosh SE to the Internet


Introduction

The basic idea is to connect the Macintosh to the Internet. This Mac does not have a network card, so I'm using a serial interface to get to a PPP server. Instead of a direct serial connection to the PPP server, I'm using a WiFi232 modem that provides a wireless connection to the PPP server. A bit complex, right?


So why not just use a serial connection directly from the Mac to the Rpi? I'm beginning to think I may need to try that. 

Materials

  • Macintosh SE FDHD
  • Sacrificial Mini Din8 serial cable 
  • Sacrificial DB9 serial cable
  • WiFi232 Modem 
  • Raspberry Pi Zero
  • 32 GB Micro SD Card
Most of the information to set this up can be found at http://podsix.org/articles/pimodem/. I think any WiFi232 Modem should work. I used this one RS232 Serial Wifi Modem for Vintage Computers V3

Build a straight through serial cable for your Macintosh to the WiFi232 Modem. My modem has a female DB9 connector. 

DB9              Mini Din 8
------           ----------
     1 
RXD  2 ---------- 5 RXD- Received data
TXD  3 ---------- 3 TXD- Transmitted data
DTR  4
GND  5 ---+------ 4 GND  Signal ground
          +------ 8 RXD+ Received data
DSR  6 
RTS  7 ---------- 1 HSKo Handshake output
CTS  8 ---------- 2 HSKi Handshake input
     9
Shield ---------- Shield


I sacrificed an old Palm Pilot serial cable with a female DB9 connector and used a male-to-male DB9 adapter to connect the two. 

For the Macintosh you need a Mini Din8 connector. I cut a Mac serial cable 

Setup Raspberry Pi

Follow the usual instructions for setting up a Raspberry Pi. You can go headless if you like. We're going to either create or modify the following files:
/etc/ppp/options
/etc/ppp/pap-secrets
/etc/xinetd.d/pppd
/etc/xinetd.d/telnet
/usr/local/bin/ppplogin
/etc/hosts.allow
/etc/iptables.rules
/etc/sysctl.conf

Make sure you update and upgrade your RPi operating system. 

$ sudo apt-get update
$ sudo apt-get upgrade

Install telnet, xinetd, telnetd, and ppp. If you want to use ZMODEM file tranfers, include lrzsz

$ sudo apt install telnet xinetd telnetd ppp lrzsz

Allow pppd to run with elevated permissions.

$ sudo chmod a+s /usr/sbin/pppd

Create ppp user.

$ sudo useradd -m ppp
$ sudo usermod -aG dip ppp
$ sudo usermod -s /usr/sbin/pppd ppp
$ sudo touch /home/ppp/.hushlogin

Configure pppd. Backup the original files

$ sudo mv /etc/ppp/options /etc/ppp/options.orig
$ sudo mv /etc/ppp/pap-secrets /etc/ppp/pap-secrets.orig

Replace options with the following in the file /etc/ppp/options

$ sudo nano /etc/ppp/options

# We will be doing PPP over Telnet - disable serial control.
local
# Terminate connection if remote side stops responding.
lcp-echo-interval 30
lcp-echo-failure 4
# Debug adds a lot of detail into the system logs regarding PPP negotiation.
# This is helpful in debugging client issues.
debug
# IP addresses to use in local:remote format.  We use NAT to share
# the Wi-Fi connection, make sure these are outside of your real subnet.
192.192.1.1:192.192.1.2 
# Other sensible options
asyncmap 0
passive
noipx

Replace pap-secrets with the following in the file /etc/ppp/pap-secrets

$ sudo nano /etc/ppp/pap-secrets

# Allow any username/password
* * "" *

Configure xinetd to enable ppp over telnet in the file /etc/xinetd.d/pppd

$ sudo nano /etc/xinetd.d/pppd

service pppd
{
type = UNLISTED
flags = REUSE
socket_type = stream
wait = no
user = root
server = /usr/sbin/in.telnetd
server_args = -h -L /usr/local/bin/ppplogin
disable = no
bind = 0.0.0.0
port = 2323
}

Configure xinetd to enable telnet in the file /etc/xinetd.d/telnet

$ sudo nano /etc/xinetd.d/telnet

service telnet
{
disable = no
flags = REUSE
socket_type = stream
wait = no
user = root
server = /usr/sbin/in.telnetd
log_on_failure += USERID
}

And in the file /usr/local/bin/ppplogin

$ sudo nano /usr/local/bin/ppplogin

#!/bin/bash
/bin/login -f ppp

Set the ppplogin script we created to be executable and enable xinetd.

$ sudo chmod +x /usr/local/bin/ppplogin

Edit /etc/hosts.allow and add the following. 

$ sudo nano /etc/hosts.allow

in.telnetd:ALL:ALLOW

Enable and start xinetd.

$ sudo systemctl enable xinetd
$ sudo systemctl restart xinetd

Make sure that xinetd is listening on port 2323:

$ netstat -an | grep :2323
tcp        0      0 0.0.0.0:2323            0.0.0.0:*               LISTEN

Configure IP masquerading (i.e. NAT).

$ sudo iptables -t nat -A POSTROUTING -o wlan0 -j MASQUERADE
$ sudo sh -c "iptables-save > /etc/iptables.rules"

File iptables.rules should look something like this.

$ cat /etc/iptables.rules
# Generated by xtables-save v1.8.2 on Wed Feb 17 18:53:54 2021
*nat
:PREROUTING ACCEPT [0:0]
:INPUT ACCEPT [0:0]
:POSTROUTING ACCEPT [0:0]
:OUTPUT ACCEPT [0:0]
-A POSTROUTING -o wlan0 -j MASQUERADE
COMMIT
# Completed on Wed Feb 17 18:53:54 2021

Edit /etc/sysctl.conf and uncomment the ip_forward line

$ sudo nano /etc/sysctl.conf

# Uncomment the next line to enable packet forwarding for IPv4
net.ipv4.ip_forward=1

Create script to restore iptables rules after reboot in file /etc/network/if-pre-up.d/iptables

$ sudo nano /etc/network/if-pre-up.d/iptables

#!/bin/bash
iptables-restore < /etc/iptables.rules

Make it executable and reboot

$ sudo chmod +x /etc/network/if-pre-up.d/iptables
$ sudo reboot

Make sure ip forwarding is enabled.

$ cat /proc/sys/net/ipv4/ip_forward
1

Check that the masquerade rule is in place

$ sudo iptables -t nat -L POSTROUTING -nv
Chain POSTROUTING (policy ACCEPT 0 packets, 0 bytes)
    6   573 MASQUERADE  all  --  *      wlan0   0.0.0.0/0            0.0.0.0/0
 pkts bytes target     prot opt in     out     source               destination         

Setup Your Macintosh

Now to the Macintosh.

I'm setting this up on System 7.5.1. 

MacPPP

The 68000 processor of the Mac SE prevents using Open Transport so you'll need MacPPP instead. You need MacPPP, 

MacTCP

You'll also need MacTCP. I'm using Glenn's MacTCP patched version 2.1 available at http://www.mactcp.org.nz/mactcp.html.

MacTCP Watcher 1.1.0

This tool will allow you to test your network with Ping, UDP, TCP, and DNS. You can also use MacPing but, as named, it only tests ping.

NCSA Mosaic 1.0.3

Or some other browser. There are several that work with a 68000. 

ZTerm 1.0.1 

ZTerm is handy for telnet sessions. I this by getting telnet to work first.

Installation & Configuration
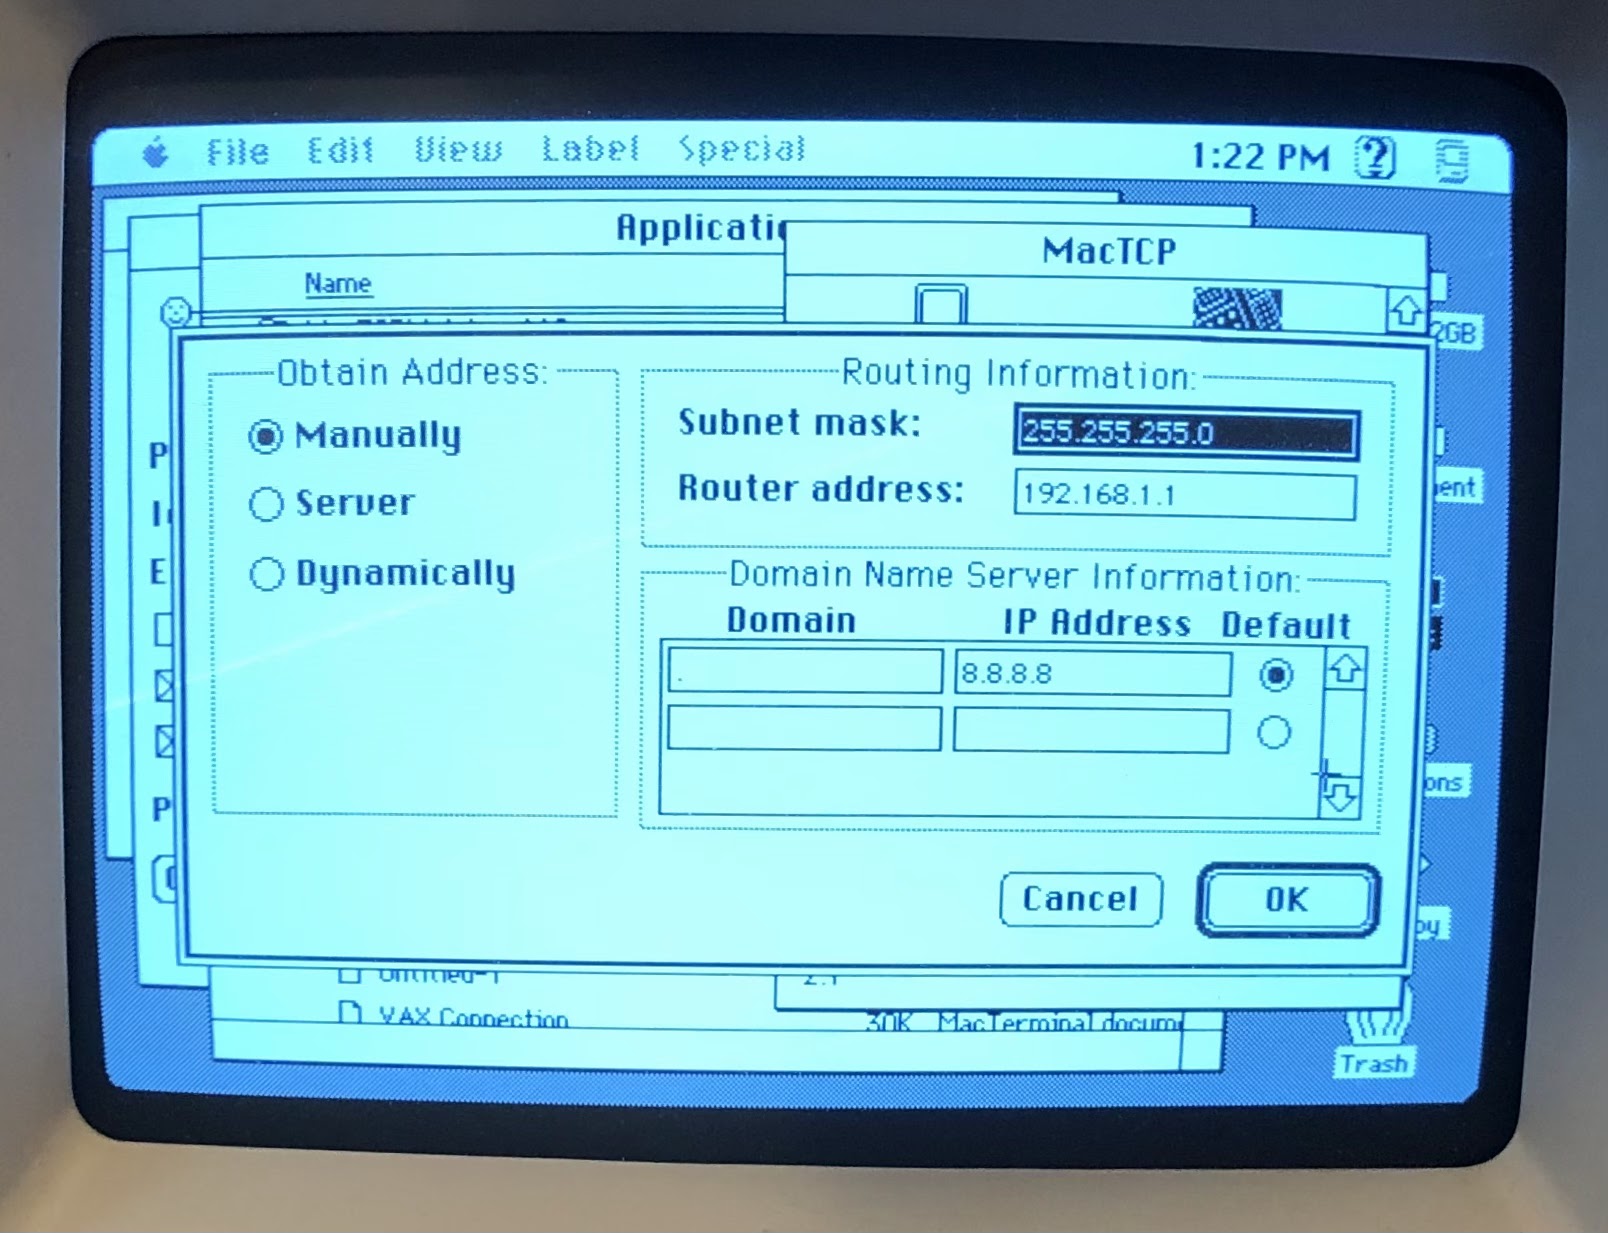
There are several guides for installing and configuring MacTCP and MacPPP. I'll go over the settings I've tried.

MacTCP

You'll need MacPPP installed before you can configure MacTCP. 

Select PPP.
Click the "More..." button.
Select the following options:

    Obtain Address: Manually
    Subnet mask: 255.255.255.0 
    Router address: 192.168.1.1
    Domain: .
    IP Address: 8.8.8.8


MacPPP

Port Name: Modem Port
Idle Timeout (minutes): None
Echo Interval (seconds): Off
Terminal Window: unchecked
Hangup on Close: checked
Quite Mode: checked


Create a new PPP Server by clicking "New..." and entering a name. Mine is "Raspberry Pi"
Select the following options:

    PPP Server Name: Raspberry Pi
    Port Speed: 57600*
    Flow Control: CTS & RTS (DTR)
    Tone Dial: checked
    Phone num: 192.168.1.33:2323**
    Modem Init: ATNET1***
    Modem connect timeout: 90 seconds

   
Under LCP Options I left the defaults. I did try changing the MRU Local and Remote values to 500 to no effect. I also tried to following the settings recommended at https://www.jagshouse.com/PPPGuide.html with no change in the result.


Under IPCP Options I left most of the defaults. I inserted the Local and Remote IP Addresses from the PPP configuration on the RPi. 
    Local: 192.192.1.2 
    Remote: 192.192.1.1


*I've tried this at 9600 to see if I was serial speed issues. 9600 is basically a safe speed to test at. Didn't make a difference in the results.

** This is the IP address of the Raspberry Pi and the port configured for the PPP interface.

***ATNET1 puts the WiFi232 modem in telnet mode.

Conclusion

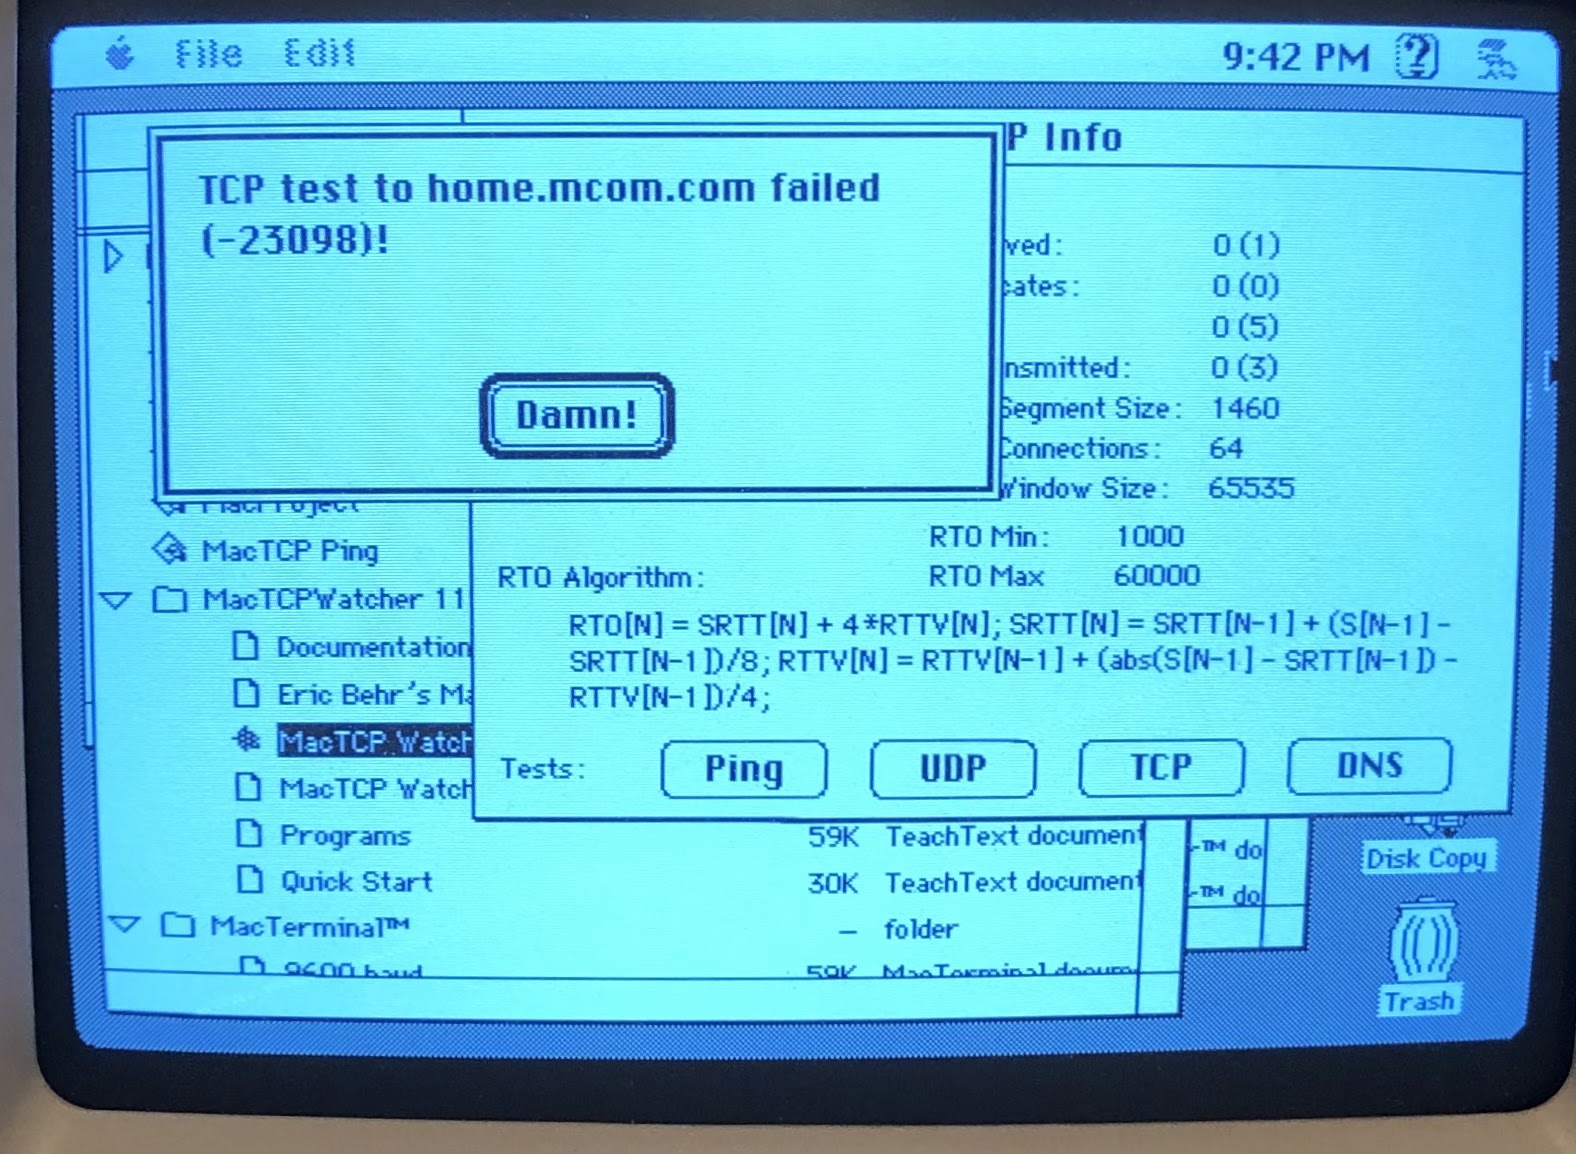
I must admit, this was not entirely successful and I'm having difficulty sorting out what is wrong. 
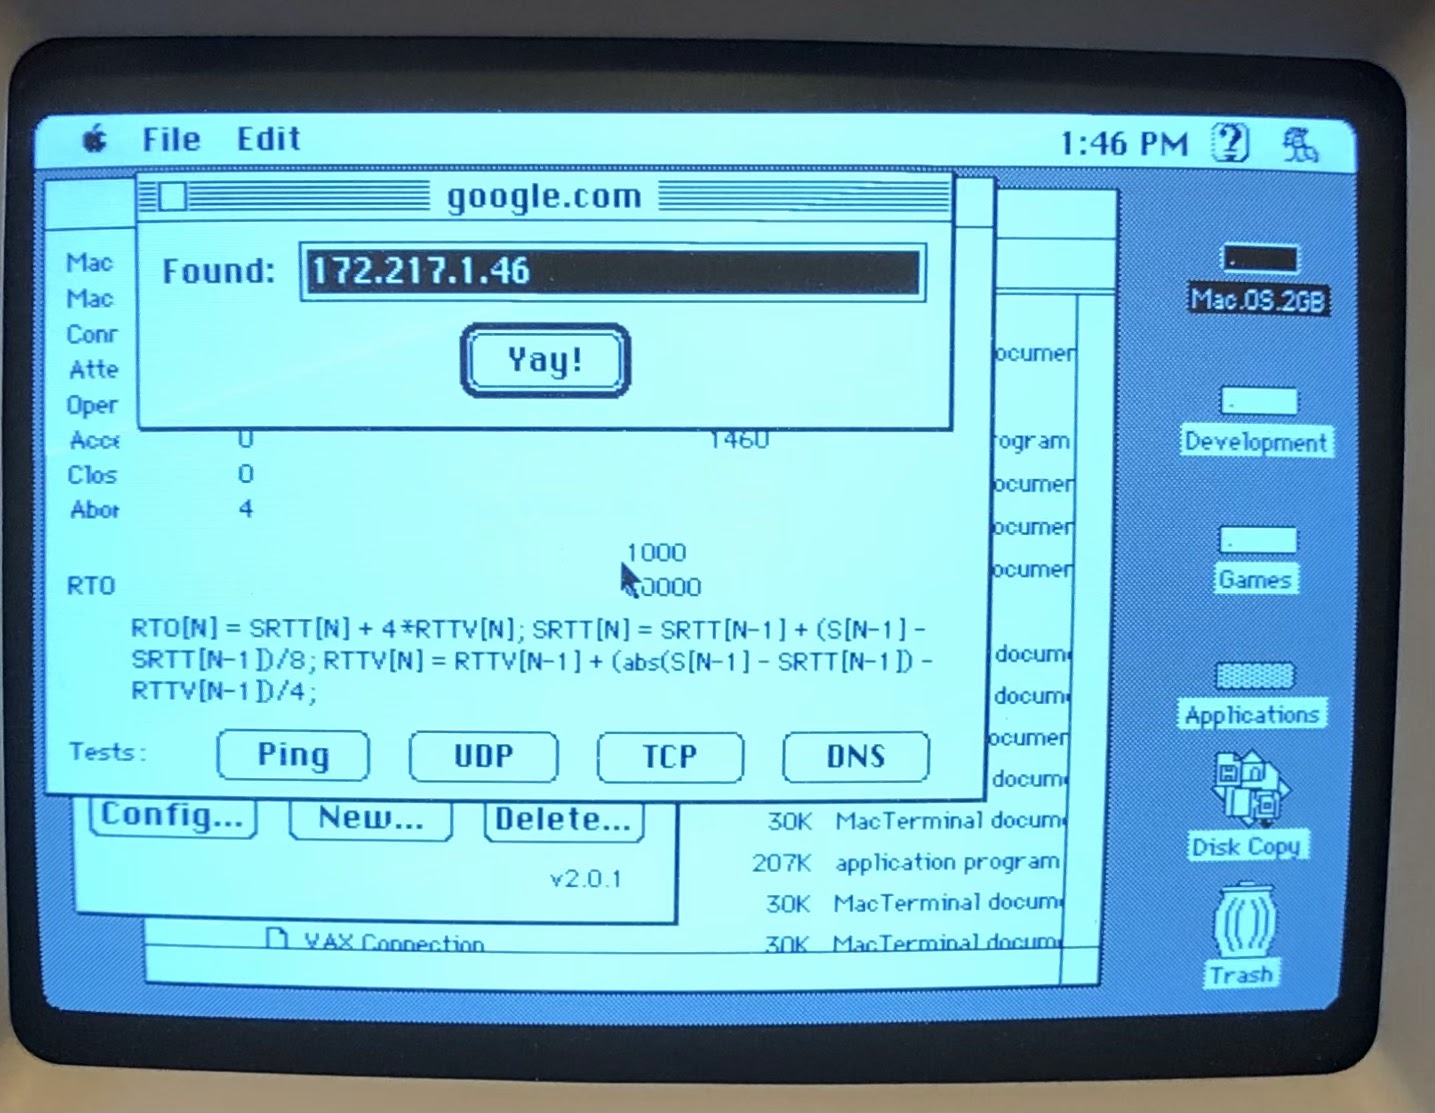
DNS works.


ICMP (ping) works. 

TCP does not work.


And can anyone tell me what this error number represents -23098? I cannot find any documentation for MacTCP Watcher.


A tcpdump of the ppp0 interface when pinging google.com gives the following:

$ sudo tcpdump -i any -A  -nvvv host 192.192.1.2
tcpdump: listening on any, link-type LINUX_SLL (Linux cooked), capture size 262144 bytes 
16:37:07.042160 IP (tos 0x0, ttl 255, id 44, offset 0, flags [none], proto ICMP (1), length 42)
    192.192.1.2 > 172.217.6.14: ICMP echo request, id 31047, seq 0, length 22
E..*.,....F............%yG...Watcher......
16:37:07.161128 IP (tos 0x0, ttl 113, id 0, offset 0, flags [none], proto ICMP (1), length 42)
    172.217.6.14 > 192.192.1.2: ICMP echo reply, id 31047, seq 0, length 22
E..*....q..)...........%yG...Watcher......

And when testing TCP, it retries several times before giving up with "TCP test to google.com failed (-23098)". 

Trying with the IP address gives the same result:

16:40:30.730573 IP (tos 0x0, ttl 60, id 54, offset 0, flags [none], proto TCP (6), length 44)
    192.192.1.2.1313 > 172.217.6.14.7: Flags [S], cksum 0xf6b0 (correct), seq 2406388000, win 2737, options [mss 536], length 0
E..,.6..<.      ..........!...n. ....`.
.........
16:40:34.188019 IP (tos 0x0, ttl 60, id 55, offset 0, flags [none], proto TCP (6), length 44)
    192.192.1.2.1313 > 172.217.6.14.7: Flags [S], cksum 0xf6b0 (correct), seq 2406388000, win 2737, options [mss 536], length 0
E..,.7..<.      ..........!...n. ....`.
.........
16:40:36.960130 IP (tos 0x0, ttl 60, id 56, offset 0, flags [none], proto TCP (6), length 44)
    192.192.1.2.1313 > 172.217.6.14.7: Flags [S], cksum 0xf6b0 (correct), seq 2406388000, win 2737, options [mss 536], length 0
E..,.8..<.      ..........!...n. ....`.
.........
16:40:43.197576 IP (tos 0x0, ttl 60, id 57, offset 0, flags [none], proto TCP (6), length 44)
    192.192.1.2.1313 > 172.217.6.14.7: Flags [S], cksum 0xf6b0 (correct), seq 2406388000, win 2737, options [mss 536], length 0
E..,.9..<.      ..........!...n. ....`.
.........


Saturday, March 9, 2019

Retro Computing: TRS-80 Model 100 as a Serial Terminal

Retro Computing
TRS-80 Model 102 as a Serial Terminal


The TRS-80 Model 102 was one of the computers I really wanted but couldn't afford (original price $1134 for the 32K model). Not a just married community college student anyway. I saw it when a kid I knew from high school showed up in the college computer lab with one. The sysadmin let him connect it to the PDP 11 computer "just for fun".

It wasn't the first "laptop" computer, but it was one of the better ones. The 80c85 CPU only needed 5 volts, which allowed it to last about 20 hours on four AA batteries. How many portable computers could do that in the 80's? You can learn more about it on https://en.wikipedia.org/wiki/TRS-80_Model_100.

I finally picked one up on eBay. Not a bad purchase for supposedly obsolete electronics. Not only did it have a full 32 kilobytes of memory, the prior owner had added an Interactive Solutions ROM with four applications (original price $149.95) and a PG Design CMOS Expansion RAM module (original price $499). 

The applications stored on ROM allowed more complex applications that wouldn't normally fit in the available RAM. The expansion module let you switch between multiple groups of applications and data stored in additional RAM chips.


26-3844/RS Model 102 - Software - Interactive SolutionsThe Interactive Solutions ROM module provides the user with three integrated programs: Data Manager, Data Calc, and Word Processor. Information stored in Data Manager can be utilized by the spreadsheet and word processor. Data Manager forms can have up to 20 fields per record. You may perform addition or subtraction on numeric fields and sort information in ascending or descending order. Data Calc, the spreadsheet, offers standard math functions plus averages, square roots, sines, cosines, and the constant pi. The work-sheet can be a maximum of 99 rows long and 99 columns wide. The word processor uses the functions of TEXT and adds more printing parameters such as Page length; Page width; Top, Bottom, Right, Left margins; Justification; Line Spacing; and Headers and Footers can be specified before printing. The date and page number can be automatically printed. Uses optional ROM socket so that it does not occupy RAM.
PG Designs 224K RAM Expansion Module for Model 100User-installable upgrade is like having 8 Model 100s at your command! Comes with transfer program on cassette. Includes battery for battery backup. 

A M100 Serial Terminal

So, how do you setup a serial to usb null modem connection between a TRS-80 Model 102 and a Raspberry PI desktop Debian computer?


There are some websites that were very helpful in figuring this out. 


The screen for the M100 is only 40 characters wide and 8 lines high. For Debian to send text to the M100 correctly, it needs to know what its capable of displaying. For example, colors are unavailable on the M100. In *nix system, terminfo handles this with a termcap file. Fortunately, the open source community likes to keep everything. We can still get a termcap file for obsolete terminals. 

Eric S. Raymond, long-time hacker and participant in the open source movement, is the maintainer of the BSD terminal-type database. If you search out his website www.catb.org, you will find various files including the "Unidentified Feeping Objects" file which contains mysterious, obsolescent, and junk termcap entries. For some reason I haven't figured out yet, the files I downloaded from the site are not recognized as gzip'd files. Fortunately, I found a couple of references to the M100 termcap around the Internet.


Here's how I setup my Raspbian laptop. 

Create a termcap file named trs100.ti containing the following text. The "trs100" in the first line before the first vertical line is what we need to reference the termcap settings.

trs100|Radio Shack Model 100:\
        :am:bs:xt:\
        :co#40:li#8:\
        :al=\EL:bl=^G:cd=\EJ:ce=\EK:cl=\EE:cm=\EY%+ %+ :\
        :cr=^M:dl=\EM:do=^J:ho=\EH:kb=^H:kd=^_:kl=^]:kr=^\:\
        :ku=^^:le=^H:nd=\034:se=\Eq:sf=^J:so=\Ep:up=\EA:\
        :ve=\EP:vi=\EQ:

As root, use tic to convert and install the termcap file for use by terminfo.

sudo tic trs100.ti

Change to the /lib/systemd/system directory and copy the serial-getty@.service template to a new file using the name of the port you are using. In my case the USB port is ttyUSB0. I confirmed this by plugging in my serial-to-usb cable and running:

sudo dmesg | grep tty

My cable uses the pl2303 chipset. The output was pretty obvious.

[    0.000000] console [tty0] enabled
[   10.884475] systemd[1]: Created slice system-serial\x2dgetty.slice.
[   14.509182] usb 3-1: pl2303 converter now attached to ttyUSB0

cd /lib/systemd/system
cp serial-getty@.service serial-getty@ttyUSB0.service

Next, edit the file. We're going to make a few changes. We need to enable 1200 baud and user our new trs100 termcap settings.Use whatever text editor you want. I prefer vi.

sudo vi serial-getty@ttyUSB0.service

Change the following line:

ExecStart=-/sbin/agetty --keep-baud 115200,38400,9600 %I $TERM

to read:

ExecStart=-/sbin/agetty --keep-baud 115200,38400,9600,1200 %I trs100

I added 1200 baud to the list of possible baud rates and set terminfo to the trs100 termcap.

Here's the full file:


#  This file is part of systemd.
#
#  systemd is free software; you can redistribute it and/or modify it
#  under the terms of the GNU Lesser General Public License as published by
#  the Free Software Foundation; either version 2.1 of the License, or
#  (at your option) any later version.

[Unit]
Description=Serial Getty on %I
Documentation=man:agetty(8) man:systemd-getty-generator(8)
Documentation=http://0pointer.de/blog/projects/serial-console.html
BindsTo=dev-%i.device
After=dev-%i.device systemd-user-sessions.service plymouth-quit-wait.service
After=rc-local.service

# If additional gettys are spawned during boot then we should make
# sure that this is synchronized before getty.target, even though
# getty.target didn't actually pull it in.
Before=getty.target
IgnoreOnIsolate=yes

[Service]
ExecStart=-/sbin/agetty --keep-baud 115200,38400,9600,1200 %I trs100
Type=idle
Restart=always
UtmpIdentifier=%I
TTYPath=/dev/%I
TTYReset=yes
TTYVHangup=yes
KillMode=process
IgnoreSIGPIPE=no
SendSIGHUP=yes

[Install]
WantedBy=getty.target

Then create a symbolic link so systemd can pick up the modified configuration.

sudo ln -s /etc/systemd/system/serial-getty@ttyUSB0.service /etc/systemd/system/getty.target.wants/

Start and enable the service so that it will be available after reboot. I had to also reload the daemon. I think this was due to prior attempts to setup the service. If you're doing this the right way from the start, you may not need to do so or maybe you do. 

systemctl daemon-reload
systemctl start serial-getty@ttyUSB0.service
systemctl enable serial-getty@ttyUSB0.service

Connecting the M100

Connect the DB25 end of your null modem cable to your M100 serial port, the DB9 end to your usb-to-serial adapter cable, then plug the into your laptop's USB port.

On your M100, start the TELCOM program. 
Press F3, enter 58N1E, and press ENTER. This sets the communication parameters to 1200 baud, 8 bit, no parity, 1 stop bit, and XON/XOFF enabled.

The possible settings for the M100 are: 
The first character is the baud rate
    1 = 75
    2 = 110
    3 = 300
    4 = 600
    5 = 1200
    6 = 2400
    7 = 4800
    8 = 9600
    9 = 19200
Second is the size of the data sent over the connection, 7 or 8 bit
Third is parity bit used for error checking
    E = even
    O = odd
    N = none
    I = ignore
Forth is the number of stop bits, 1 or 2
And fifth is to enable or disable XON/XOFF, E = enabled or D = disabled.

Press F4 and press ENTER. This starts terminal communication. You may need to press the ENTER key a few times, but eventually you will be prompted to enter your user name and password.
If the bottom line over F4 says "Half". You want to change it to full duplex. Otherwise, every character you type will be echoed back to the screen, doubling the characters displayed. For example, if your user name is "pi", you'll end up with "ppii" displayed on the screen. Press F4 so that it says "Full".  

Honestly, there's not much to do with such a limited terminal. I just enjoy the challenge of making it work. 

Happy retro computing!


Saturday, November 17, 2018

Reduced Sugar Oatmeal Cherry Cookies


Reduced Sugar Oatmeal Cherry Cookies


Based on the the Oatmeal Cookies: King Arthur Flour recipe.

My Modifications 
12 minute bake at 350
2 egg yolks for 1 egg
1 stick butter - no shortening 
1/4 cup Truvia brown sugar blend for brown sugar 
1/4 cup Sola low cal sweetener for sugar
Air core baking sheet 
Malt vinegar for white vinegar 

Results 
Slightly brown and crisp around the edges at 12 minutes. Holds together well enough, but still a little delicate to handle. Nice moisture. Would probably be too dry without the fruit. A little too sweet, probably due to the sugar added to the cherries - why can’t I find dried cherries or cranberries without added sugar? I’ll reduce the Sola by half next time. 


Here's the original recipe from King Arthur Flour
AT A GLANCE
PREP 12 mins. to 15 mins.
BAKE 12 mins. to 14 mins.
TOTAL 24 mins. to 29 mins.
YIELD 22 cookies without raisins, 24 cookies with raisins.

Crunchy around the edges, softer in the center, these oatmeal cookies feature the nutty taste and nubbly texture of oats. 

Our guarantee: These cookies will be mildly crunchy around the edge, softer in the center, and very mildly spiced; oats are the star. They'll be 1/4" thick and 2 1/2" to 3" wide when scooped in 1 1/4" balls.

4 tablespoons (1/4 cup) unsalted butter
1/4 cup vegetable shortening
1/2 cup light brown sugar
1/4 cup granulated sugar
1 teaspoon vanilla extract
1 1/4 teaspoons ground cinnamon
1/8 teaspoon ground nutmeg
1/2 teaspoon salt
1 teaspoon cider or white vinegar*
1 large egg
1/2 teaspoon baking soda
3/4 cup King Arthur Unbleached All-Purpose Flour
1 1/2 cups rolled oats, quick cooking or old-fashioned
1 cup golden raisins, optional; or Jammy Bits*

*See "tips," below.

Directions
Preheat the oven to 350°F. Lightly grease (or line with parchment) two baking sheets, light-colored preferred.

Beat together the butter, shortening, sugars, vanilla, cinnamon, nutmeg, salt, and vinegar until fairly smooth; a few tiny bits of butter may still show.

Beat in the egg, again beating until smooth.

Add the baking soda and flour, beating until well incorporated.

Add the oats (and raisins), stirring to combine.

Drop the dough in 1 1/4" balls onto the prepared baking sheets; a tablespoon cookie scoop works well here. If you're measuring, this is about 2 level tablespoons (using a tablespoon measure, not a dinner spoon). Space the cookies 2" apart; they'll spread.

Bake the cookies for 12 to 14 minutes, reversing the pans halfway through (top rack to bottom, bottom to top). For softer cookies, bake the lesser amount of time; for crunchier, the longer amount. At 12 minutes, especially if you're baking on a dark pan without parchment, a few of the cookies on the edge should just barely be showing a pale brown around their edges. At 14 minutes, they should be starting to color all over.
Remove the cookies from the oven, and let them cool right on the pan.
Yield: 22 to 24 cookies.

Tips from our bakers
Jammy Bits, sweet, soft little morsels of fruit purée, come in six true-fruit flavors: raspberry, blueberry, strawberry, orange, apricot, and peach.
While it's easier to beat butter that's at cool room temperature, it's not necessary to wait for it to warm up if you've taken it straight from the fridge. You'll just need to beat it a bit longer.
Substitute butter for the vegetable shortening, if desired; the texture of the cookies will be a slight bit cakier.
For round, symmetrical cookies, be sure to leave 2" between them on all sides. This is sufficient room that they won't spread and touch one another.
If your baking sheets are dark/black, shorten the baking time by a minute or so. If you use air-insulated cookie sheets (which we don't recommend), increase the baking time by a couple of minutes.
If you're a fan of salty/sweet, the merest sprinkle of salt (extra-fine preferred) atop the just-baked cookies brings their flavor over the top.
*Why vinegar in a cookie recipe? It helps cut the sweetness and also gives your baking soda a bit of a boost. Mystery solved!
Mystery solved!

Tuesday, June 13, 2017

1745 Highlander Frock Coat


Here's the frock coat I made inspired by Colum MacKenzie's gathering coat.

I started with J.P. Ryan's 1750’s Coat with Military Variations for the Officer or Enlisted Man. I used the civilian coat cut a bit shorter than the length of the enlisted coat. The shorter length is made for riding horseback (unlikely in reality) and also to give enough room for my great kilt. I like the instructions provided with the pattern and the illustrations are good. It would be nice if there were videos to go with it, but I figured it out eventually.

As this is my first coat, I didn't want to spend a lot of money, so I used a 50/50 wool blend Melton fabric and cotton lining. The buttons are inexpensive ones found online from China. Instead of horsehair interfacing, I used a medium weight synthetic. I also saved money by using polyester buttonhole thread instead of silk twist and waxed cord instead of gimp. There is also none of the lace found on Colin's coat. The next coat will be tartan with silk or linen for the lining.

Machine stitched where it can be hidden and by hand wherever visible. The buttonholes are cut with a chisel and hand stitched with gimp cord and heavy polyester thread.

The buttons are pushed through holes for the button shaft made with an awl and held in place with twill tape. The tape is threaded through the shafts and sewn at each end inside the coat, between the outer layer and the lining.


Thursday, November 24, 2016

Updated OS X instructions for creating a floppy disk image

My old post for making a floppy disk image didn't work as described when I tried it recently. Here's an update.

The hdiutil command can be used to create the image.

$ hdiutil create -layout NONE -fs MS-DOS -sectors 2880 floppy

Then use hdid to output the name of the device file created.

$ hdid -nomount ./floppy.dmg

Use the output from hdid to create a mount point and mount the image.

$ mkdir /Volumes/mnt
$ mount -t msdos /dev/disk2 /Volumes/mnt

Now you can copy your files to the disk image. Use the usual disk "eject" to unmount if you like.

Monday, April 13, 2015

State of the 'Stache: Five Months Later...

I've been pretty busy with a new job and our recent adventure into Steampunk (more about that later). The beard and moustache are coming along.

The 'stache requires quite a quantity of wax. I've settled on the dark version of Firehouse wax. The middle of the road as it were.

Switched from my barber to our friend who styles my wife's hair. She has more experience with long hair. Oh, I forgot to mention that I'm growing my hair long enough to queue and club. I'd like to venture into 18th century reenacting. In a kilt of course.

Well, here's the current look. The photo was taken at the second annual Gears, Beards, and Beers a Steampunk themed Beard & Moustache Competition hosted by Capital Steam and the Jackson Beard & Moustache Club (more about that later). On my left is my sister Lori and on my right is my wife Stacey.

I made the double breasted jacket from a modified McCall's Men's Civil War Costumes pattern M4745. I'll post construction instructions later.